|
|

|
|

Tips and Techniques
Compiled by Katherine Dewey
TABLE OF CONTENTS
Selecting Your Clay
Preparing the Clay
Tools of the Trade
Using Armatures
Creating Textures
Series Baking
Proportioning the Human Figure
Modeling the Animal Figure
Polychrome Detail
Tips Forum
to ask new ones!

Selecting Your Clay
Confronted with an array of competing brands, all of whom keep adding new product lines, the sculptor has a job
to do just to decide which to use. With that in mind, here are my observations about some of
the most popular brands on the market:
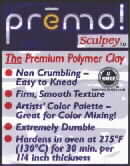


Sculpey
Polyform Products manufactures several versions of polymer clay in its Sculpey line. When fresh, these clays are fairly soft and easy to condition. All formulas are suitable for sculpting.
- Sculpey (original) is the least expensive of all of the polymer clays but the weakest. Sculptures made of Sculpey need a strong armature, an inner skeleton of stiff wire or wadded aluminum foil in the limbs and body. Requires a light touch during modeling.
- Super Sculpey is a strong, soft clay available in only one color, beige-pink. Its color, strength and maliability make it a favorite of doll artists. Like original Sculpey, it takes acrylic paint very well.
- Sculpey III, available in 32 colors, is a weak, very soft clay and requires a light touch. Sculptures made of Sculpey III need to have a strong armature. After baking, the clay has a matte finish.
- Premo Sculpey has the great strength. Designed as an all purpose polymer clay with many applications, it is a soft, slightly tacky clay available in 32 colors. Leaching Premo produces a firm, workable clay that is stronger than most others.
Tip: Premo is my favorite, but try them all to find the clays best for you.
- Flexiclay is initially very firm, but softens during use. Excellent for molds, it remains flexible after baking. Experiment with this new product. Flexiclay comes in eight basic colors.
- Sculpey Clay Softener is their clay softening diluent.
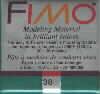
Fimo
Fimo Classic, Fimo Soft, Fimo Stone, Quick Mix, and Fimo Gloss are products manufactured by Eberhardt Faber, a long-standing art supply company.
- Fimo Classic is a strong, firm clay with a slightly chalky feel, never tacky. This clay seems to have the best "memory" of all of the clays and can take a lot of handling. Because it is difficult to blend one sculptural element to another, I don't use Fimo for modeling, but I do like it for canework, a method of creating intricate patterns out of colored clay. Fimo yields very crisp designs for that purpose.
- Fimo Soft is an easy-to-condition clay available in 12 colors. A clay for the modeler with a light touch. This clay is very soft, but responds well. Tip: Mixing 4 parts Fimo Soft to 1 part Fimo Classic makes an ideal sculpting medium.
- Fimo Stone, available in six colors, is a specialty clay with the look of stone. Like other clays of its type, it has more uses than simulating stone.
- Quick Mix is their clay softener and Fimo Gloss is their acrylic varnish
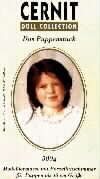
Cernit
Cernit is a clay manufactured by T + F GmbH of Germany. Initially waxy and firm, Cernit is the most heat sensitive of the polymer clays, becoming softer as you work with it. A special feathering and pressure technique is necessary to blend sculptural components. When warm, Cernit has a fair "memory." A good clay for very large figures, this clay needs a strong armature to help it keep its shape during modeling. Cernit's excellent strength after baking, its translucent colors, and porcelain-like finish make it a favorite of doll artists.
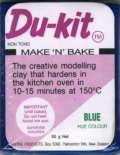
Du-Kit
From New Zealand, Du-Kit is manufactured by Creative Products and is available in stores in New Zealand, Australia, and Singapore. Available in a rainbow of colors, Du-Kit is an excellent sculpting medium with all the attributes of a world class product. Easy to blend and not too sensitive to the sculptor's touch. I fell in love with this clay! It bakes at a slightly higher temperature than some of the others (260-300� F), but not so high as to make home crafters and artists uncomfortable. Sculptures made from Du-Kit are very strong without being brittle. Try it, you'll like it! Something tells me we will be hearing a lot more about Du-Kit before long. Tip: If you don't live in the region, you can order online from Golding HandCrafts or from ZigZag, both New Zealand distributors.
Kato Polyclay
Introduced in 2002, Kato Polyclay is an exciting addition to the medium! Though it is brand new, I have had the pleasure of working with this product and look forward to using it often. Kato has managed to refine a polymer clay which keeps the sculptor in mind. Easily blended and fused, it's very flexible after baking and can be re-positioned while still warm. Color-faithful, it darkens only slightly after baking and can handle extended baking times well. Available in all the rainbow colors and several specialty hues, Kato Polyclay may just become the new sensation in polymer clay. I'm told that it will be distributed to arts/craft stores about June of this year, but if you want to get a head start, go to their on-line site at katopolyclay.com You won't regret it.
Artist's Modelene
Artist's Modelene is an Australian product, distributed by Edward Elias Import/Export in Melbourne. This PC has been in use for years in Australia and its school system, so if you are from "Down Under" you are probably very familiar with it. Available in six flesh tones and a variety of "rainbow" colors, this clay is strong after baking, and not too sensitive while working. My experience with Modelene is limited since it is so hard to find outside of Australia, but I can say it handles well and yields a strong finished work. For an update of Modelene's product line visit the Modelene Website. For an on-line sales link, pop over to the Elvenwork links page.
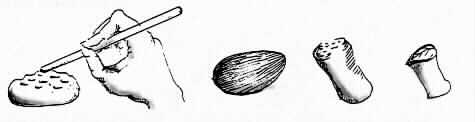
Preparing the Clay:
Often, the clay you buy from the
shelf is too soft for the sculptor to use immediately. While caners and bead
makers usually like the clay soft, in the hands of a sculptor soft clay picks
up too many unwanted impressions. The solution is to make the clay firmer by
"leaching" (sometimes called "wicking") too-soft clay before beginning your
sculpture. What you'll be doing is removing some of the liquid plasticisers
from the clay beforehand. Here's how to do it: Using a pasta machine or
non-stick rolling pin, roll out thin sheets of clay (approximately 1/8th inch
thick). Sandwich them between white, untreated typing paper. Stack the
paper/clay sandwiches and place a weight on the stack (a book will do). Check
it after 2 to 3 days for firmness. If the clay is still too soft, change
paper, and repeat until you're satisfied with the consistency.
Tools of the Trade:
Detailing tools can be as simple or
complicated, as inexpensive or expensive as you decide. You can even make
your own! I use a wide variety, ranging from dental hand tools, commercially
available wax detailing tools, and many I've made myself. If you intend to do
your work on the small scale I do, these are the tools I recommend you have
to start with:

Using Armatures:
The most disheartening experiences a polymer clay sculptor
can have are to create the perfect form and have it collapse in the oven, have delicate
parts break after baking, or use so much clay the entire project fails. Those are the principle
reasons for using internal armatures. I use two main armatures: wire and aluminum foil. Think
of wire armatures as crude, sturdy skeletons for the portions of your sculpture that should
be reinforced (e.g. thin limbs such as an arms outstretched, or legs in standing figures). The
wires can be brass or steel and can be extended beyond the limb it supports to provide a
convenient way to mount your sculpture to its base, or to secure it to an accompanying figure.
The foil armature is used to reduce the amount of clay needed to complete a bulky figure and
has the added advantages of reducing curing time and making the figure stronger. For bulky
figures (eg. a toad or rabbit), I often begin with a well compressed ball of aluminum foil
pounded into the general shape of the final form, then build the clay over the armature. A
combination of the two kinds of armatures can be used.
Tip: Apply a polyvinyl glue
(e.g. Sobo Glue) to armatures and let dry before applying clay to provide a strong bond between
metal and clay.
Creating Textures:
Giving texture to a figure is one of the greatest
challenges in creating a realistic piece. Whether the texture is fur, feathers, folds,
or warts, the devil is in the detail. At first, you should experiment with direct etching,
using the tools of the trade, perhaps etching fur or feather lines with a needle held so it
drags along the surface, rather than gouging. The process can be tedious, but the act of
creating these details teaches you a great deal. Once you have mastered the detailing for the
piece you are sculpting, and. especially if you intend to reproduce it, the next logical step
is to create direct surface application molds that will do the work for you. These molds
(or stamps) are reverse images of the repetitive features you find in the subjects you sculpt
and can be taken directly from your finished work or etched directly on the mold by hand. Not
intended to "stamp out" the entire element of the sculpture, they recreate subtleties in
texture. Impressing areas of a sculpture with a press mold made of polymer clay, saves time
and effort. Here are some simple examples:
Series Baking:
Polymer clay can be baked several times without negative
effects. This quality of the clay enables the sculptor to protect delicately modeled parts and
build a solidly cured foundation for additional elements, a process I call "series baking." A
word of caution though: each step in the series should be carefully planned, since once baked,
the element is cured for good. So, as example, if the first element you bake in a human figure
is the torso, you must plan to have all the detailing done, and the necessary wire armature
sockets in place for the head, arms and legs to be attached later. Once the torso is baked,
it's shape is protected and it then becomes a convenient "handle" as each of the unbaked
components are added to the piece.
Examples of sculptural elements that should be pre-baked include eyeballs, tails of birds, and angel wings. I also find it easier to clothe a baked figure, especially when working with colored clays. Tip: Before attaching unbaked elements, apply a small amount of liquid diluent to the attachment point on the baked element. Available at most craft stores, Sculpey Diluent works with most polymer clays. It significantly improves the bond between baked and unbaked elements of your sculpture as you progress through series.
The baking temperature of polymer clay varies between brands, and sometimes from color to color. High altitude baking adjustments should also be considered. Read the label. Here are some general baking recommendations: Most polymer clays cure best at an oven temperature of between 265� and 275�. If you are uncertain about the accuracy of your oven thermostat, invest in a good quality oven thermometer. A useful rule of thumb is to allow 20 minutes of baking for each �-inch thickness of clay, excluding foil armatures (e.g. if the figure is formed with �-inch of clay covering a foil core, baking time would be about 20 minutes regardless of the overall thickness of the piece). Tip: Polyester fiberfill, available in most department stores, makes an excellent support for delicate pieces while they're baking, and doesn't leave impressions in the clay. Tip: Use a deep Pyrex baking pan to avoid scorching the clay during the baking process.
Proportioning the Human Figure:
This section is devoted to the
figurative artist. We always struggle to "get the proportions right". The illustrations below will help you translate the human form to fit the scale you are working in. They're from my book Creating Life-Like Figures in Polymer Clay.
For centuries artists have divided and subdivided the human form, each seeking to improve their understanding of the body's particular proportions and to enhance their art. Drawn from several sources, this is a brief compilation of the proportional landmarks used by Da Vinci, Lanteri, Cousin, Richer, and Rimmer which you'll find useful in sculpting the human form. All of the proportional landmarks have variations which are effected by by race, gender, age, and body type; the differences that make each of us unique. For that reason, always keep the individual in mind while you sculpt.
Don't let the number of measurements discourage you. Put them to work and they'll become second nature. Learn to think in terms of head lengths, not inches or centimeters as you apply these landmarks to your polymer clay sculpture to achieve the realistic figure you envision.
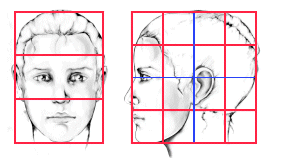
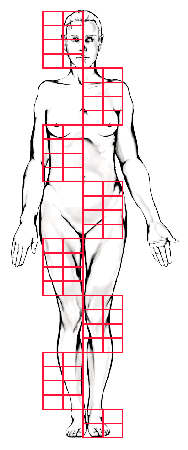
The length of the figure can vary from 6 1/2 heads to 7 3/4 heads tall. For their gladiators and gods, the Greeks and Romans preferred the dignity expressed by proportionally taller, longer limbed figure, 8 heads tall. The Mannerists often rendered figures 9 heads tall. Many of my sculptures follow the classical dimensions and are 8 heads tall, but most follow the average rule; and are 7 1/2 heads tall. The following are some of the prominent structures of the torso and limbs that serve as landmarks for proportion:
Tip: Remember to proportion your scultures like the masters, always use your head.
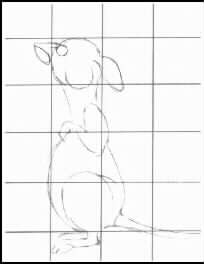
Modeling the Animal Figure: I wrote an entire book on this subject, but will continue to post my methods as time permits.
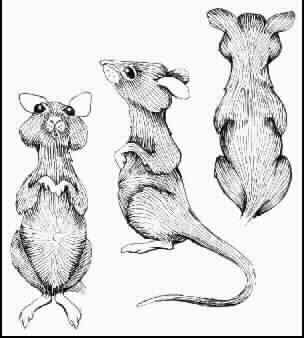
As with the human figure, every animal species has its own unique proportions. To achieve a credible finished work, it is important to study and measure the animal's features from all vantage points to avoid distortion in the sculpture. Your study should be so detailed that you can accurately render the growth patterns of fur or scales on each part of the subject. The devil is in the details. Tip: Keep notes, drawings, and graphs of the subject for reference.
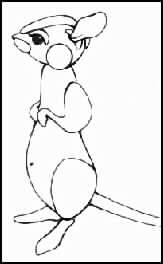
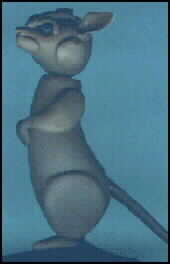
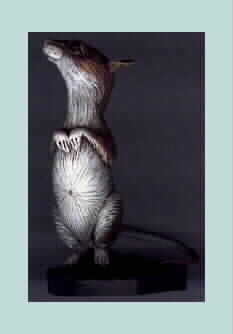
The following sequence is an example of the process I use to sculpt a mouse. Of course
there were many views and measurements in between, but I hope it gives you the general idea.
The "measurement stage" graphs not only help to determine proportion, but also to estimate the
amount of clay for each body part. For this project I used a component technique, modeling and
assembling each of the components, and creating surface details before the mouse was baked.
With the exception of the prebaked eyeballs, this can be a single-bake project, provided the
scale of the figure is as small as this one was (approximately 3 inches tall). Tip: This
figure uses armatures in the ears (paper), in the tail (thin wire), and a mounting wire rod at
its base.
Polymer paints are the other compatible paint and require heat to cure (about 265 degrees f. for 20 minutes). To build up transparent layers, it's necessary to heat cure between layers of paint. Unlike acrylics, polymer paints flow evenly from the brush, leaving no brush strokes. Surface blending is effortless because these paints don't dry until you cure them.
It's important to know that oil paints and model paints react badly with polymer clay. The solvents and suspension agents in these products leach into the clay and soften it. The surface remains tacky. Water colors and tempera tend to bleed into the fillers in the clay, especially with Cernit and Fimo. Varnish will not stop this infiltration.
Acrylics dry rapidly, are relatively inexpensive and readily available. If mistakes are made, the sculpture can be scrubbed clean. For these reasons, I recommend acrylics. They are a proven product, and the techniques are easy to master with a little practice.
Common Painting Techniques: Three painting techniques, dry brush, wash, and detail, will heighten the reality you've created with shape and texture. Each technique has a special effect on the clay. By using them prudently, your sculptures will come alive.
Dry Brush: Means just that, painting with dry bristles barely dipped in paint. Wiping the brush on a paper towel dries the bristles even more. Brush strokes should be light, grazing only the surface of a sculpture to enhance textural details, letting no paint to flow into crevices. Dry brushing softens the texture of fur or feathers because the brush only leaves a gentle dusting of pigment.Wash: A wash is a thin, transparent coat of paint that stains the dry brush coat and flows into the crevices, slightly darkening both. The underlying color of the clay and the effects of the dry brush coat will shine through, creating depth.
Detail Painting: Means using a small brush and paying attention to small things. If the dry brush and wash coats have covered the eyes, use the small brush to paint them black again. Creating markings specific to an animal, such as the spots on the fawn's back, are details more easily done with a small brush. Use it for final dry brushing if a figure or area is small. Special washes in small areas, such as the ears, nose and mouth, are another job for the small brush. Varnish on the eyes, mouth, and sometimes on the nose, is another reason for detail painting.
I'll expand this subject and add demonstration photos as time permits. elvenworking...